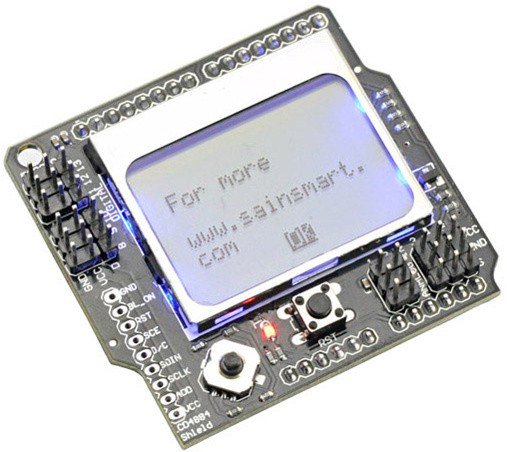
In this example I wanted to connect a shield that I purchased for Arduino development and use it with my Chipkit Uno 32. The shield is a Nokia 5110/3310 display and is called the
SainSmart Graphic LCD4884 Shield For Arduino Duemilanove UNO MEGA2560 MEGA1280.
This LCD4884 Shield provides 48×48 display. If your project need more information to display, this LCD shield can apparently meet your needs. It is able to display English, Chinese, even images. It also integrates a 5 DOF joystick. The shield has 6 Digital IO and 5 Analog IO.
Specification:
- Power Supply: 5V
- SPI Interface (using Digital Pin 2,3,4,5,6)
- One Reset button
- One 5 degree joystick (using Analog Pin 0)
- Backlight control (DIO Pin 7)
Here is a picture of the shield.
You can download a library from http://www.rinkydinkelectronics.com/download.php?f=LCD5110_Basic.zip but the basic example did not seem to work for me, I had a look at the pins that were setup in the code and checked my shield pinout and found these needed changed for the example
// SCK – Pin 8
// MOSI – Pin 9
// DC – Pin 10
// RST – Pin 11
// CS – Pin 12
//
#include <LCD5110_Basic.h>
LCD5110 myGLCD(8,9,10,11,12);
The updated code is below
Code
[codesyntax lang=”cpp”]
#include <LCD5110_Basic.h>

LCD5110 myGLCD(2,3,4,6,5);

extern uint8_t ck_logo[];
extern uint8_t oshw_logo[];

void setup()
{
  myGLCD.InitLCD();
}

void loop()
{
  myGLCD.drawBitmap(0, 8, ck_logo, 84, 32);
  delay(4000);
  for (int i=0; i<2; i++)
  {
    myGLCD.invert(true);
    delay(500);
    myGLCD.invert(false);
    delay(500);
  }
  delay(4000);

  myGLCD.clrScr();
  myGLCD.drawBitmap(14, 0, oshw_logo, 56, 48);
  delay(4000);
  for (int i=0; i<2; i++)
  {
    myGLCD.invert(true);
    delay(500);
    myGLCD.invert(false);
    delay(500);
  }
  delay(4000);

  myGLCD.clrScr();
}
[/codesyntax]
Links
SainSmart Graphic LCD4884 Shield for Arduino Uno MEGA and Duemilanove


