The TSL2560 and TSL2561 are second-generation ambient light sensor devices. Each contains two integrating analog-to-digital converters (ADC) that integrate currents from two photodiodes. Integration of both channels occurs simultaneously. Upon completion of the conversion cycle, the conversion result is transferred to the Channel 0 and Channel 1 data registers, respectively. The transfers are double-buffered to ensure that the integrity of the data is maintained. After the transfer, the device automatically begins the next integration cycle. Communication to the device is accomplished through a standard, two-wire SMBus or I2C serial bus.
Consequently, the TSL256x device can be easily connected to a microcontroller or embedded controller. No external circuitry is required for signal conditioning, thereby saving PCB real estate as well. Since the output of the TSL256x device is digital, the output is effectively immune to noise when compared to an analog signal.
The TSL256x devices also support an interrupt feature that simplifies and improves system efficiency by eliminating the need to poll a sensor for a light intensity value. The primary purpose of the interrupt function is to detect a meaningful change in light intensity. The concept of a meaningful change can be defined by the user both in terms of light intensity and time, or persistence, of that change in intensity. The TSL256x devices have the ability to define a threshold above and below the current light level. An interrupt is generated when the value of a conversion exceeds either of these limits.
Again a module is recommended, here is the one that I bought
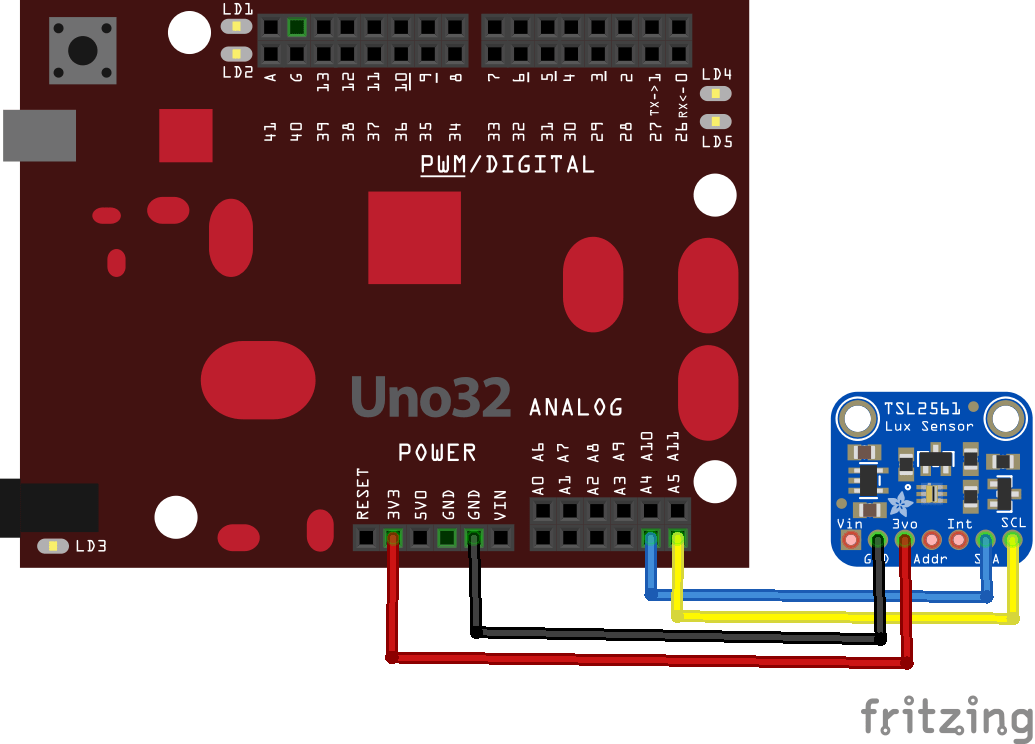
Connections
Connect SCL to Chipkit Uno A5
Connect SDA to Chipkit Uno A4
Connect VDD to 3.3V
Connect GROUND to ground
Code
You will need the sparkfun TSL2561 library
This is the default example
[codesyntax lang=”cpp”]
// Your sketch must #include this library, and the Wire library
// (Wire is a standard library included with Arduino):

#include <SparkFunTSL2561.h>
#include <Wire.h>

// Create an SFE_TSL2561 object, here called "light":

SFE_TSL2561 light;

// Global variables:

boolean gain; // Gain setting, 0 = X1, 1 = X16;
unsigned int ms; // Integration ("shutter") time in milliseconds

void setup()
{
// Initialize the Serial port:

Serial.begin(9600);
Serial.println("TSL2561 example sketch");

// Initialize the SFE_TSL2561 library

light.begin();

// Get factory ID from sensor:
// (Just for fun, you don't need to do this to operate the sensor)

unsigned char ID;

if (light.getID(ID))
{
Serial.print("Got factory ID: 0X");
Serial.print(ID,HEX);
Serial.println(", should be 0X5X");
}
// Most library commands will return true if communications was successful,
// and false if there was a problem. You can ignore this returned value,
// or check whether a command worked correctly and retrieve an error code:
else
{
byte error = light.getError();
printError(error);
}

// The light sensor has a default integration time of 402ms,
// and a default gain of low (1X).

// If you would like to change either of these, you can
// do so using the setTiming() command.

// If gain = false (0), device is set to low gain (1X)
// If gain = high (1), device is set to high gain (16X)

gain = 0;

// If time = 0, integration will be 13.7ms
// If time = 1, integration will be 101ms
// If time = 2, integration will be 402ms
// If time = 3, use manual start / stop to perform your own integration

unsigned char time = 2;

// setTiming() will set the third parameter (ms) to the
// requested integration time in ms (this will be useful later):

Serial.println("Set timing...");
light.setTiming(gain,time,ms);

// To start taking measurements, power up the sensor:

Serial.println("Powerup...");
light.setPowerUp();

// The sensor will now gather light during the integration time.
// After the specified time, you can retrieve the result from the sensor.
// Once a measurement occurs, another integration period will start.
}

void loop()
{

// ms = 1000;
// light.manualStart();
delay(ms);
// light.manualStop();

// Once integration is complete, we'll retrieve the data.

// There are two light sensors on the device, one for visible light
// and one for infrared. Both sensors are needed for lux calculations.

// Retrieve the data from the device:

unsigned int data0, data1;

if (light.getData(data0,data1))
{
// getData() returned true, communication was successful

Serial.print("data0: ");
Serial.print(data0);
Serial.print(" data1: ");
Serial.print(data1);

// To calculate lux, pass all your settings and readings
// to the getLux() function.

double lux; // Resulting lux value
boolean good; // True if neither sensor is saturated

// Perform lux calculation:

good = light.getLux(gain,ms,data0,data1,lux);

// Print out the results:

Serial.print(" lux: ");
Serial.print(lux);
if (good) Serial.println(" (good)"); else Serial.println(" (BAD)");
}
else
{
// getData() returned false because of an I2C error, inform the user.

byte error = light.getError();
printError(error);
}
}

void printError(byte error)
// If there's an I2C error, this function will
// print out an explanation.
{
Serial.print("I2C error: ");
Serial.print(error,DEC);
Serial.print(", ");

switch(error)
{
case 0:
Serial.println("success");
break;
case 1:
Serial.println("data too long for transmit buffer");
break;
case 2:
Serial.println("received NACK on address (disconnected?)");
break;
case 3:
Serial.println("received NACK on data");
break;
case 4:
Serial.println("other error");
break;
default:
Serial.println("unknown error");
}
}
[/codesyntax]
Output
Again the output can be seen via the serial monitor
TSL2561 example sketch
Got factory ID: 0X50, should be 0X5X
Set timing…
Powerup…
data0: 11 data1: 2 lux: 4.35 (good)
data0: 11 data1: 2 lux: 4.35 (good)
data0: 11 data1: 2 lux: 4.35 (good)
data0: 11 data1: 2 lux: 4.35 (good)
data0: 10 data1: 2 lux: 3.82 (good)
data0: 10 data1: 2 lux: 3.82 (good)
data0: 11 data1: 2 lux: 4.35 (good)
data0: 21 data1: 3 lux: 8.85 (good)
data0: 27 data1: 3 lux: 11.90 (good)
Links
TSL2561 Luminosity Sensor Breakout infrared Light Sensor integrating sensor


