
2.4K
In a previous example we connected a 16×2 LCD to our development board and displayed text on it, in this example we use the 2 buttons on the board to display some text on the LCD
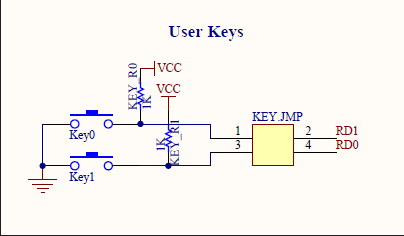
There are 2 buttons on the board, slightly confusing is that Key 1 on the board is connected to RD0 and Key 2 on the board is connected to RD 1. You can see this in the section of the schematic below.
In the code example we will display a message on the LCD depending on which button is pressed
Code
This code was written in MikroC and uses the LCD libraries
[codesyntax lang=”cpp”]
// LCD module connections
sbit LCD_RS at RC4_bit;
sbit LCD_EN at RC6_bit;
sbit LCD_D4 at RD4_bit;
sbit LCD_D5 at RD5_bit;
sbit LCD_D6 at RD6_bit;
sbit LCD_D7 at RD7_bit;

sbit LCD_RS_Direction at TRISC4_bit;
sbit LCD_EN_Direction at TRISC6_bit;
sbit LCD_D4_Direction at TRISD4_bit;
sbit LCD_D5_Direction at TRISD5_bit;
sbit LCD_D6_Direction at TRISD6_bit;
sbit LCD_D7_Direction at TRISD7_bit;
// End LCD module connections


void main()
{
    TRISD.F0 = 1;
    TRISD.F1 = 1;
    do{
    Lcd_Init(); // Initialize LCD
    if(PORTD.F0 == 0)   //If the switch is pressed
    {
       Delay_ms(100);    //Switch Debounce
       if(PORTD.F0 == 0)//If the switch is still pressed
       {
         Lcd_Cmd(_LCD_CLEAR); // Clear display
         Lcd_Cmd(_LCD_CURSOR_OFF); // Cursor off
         Lcd_Out(1,1,"BUTTON 1");//Write text'button 1' in first row
         Delay_ms(1000);
       }
    }
    if(PORTD.F1 == 0)   //If the switch is pressed
    {
       Delay_ms(100);    //Switch Debounce
       if(PORTD.F1 == 0)//If the switch is still pressed
       {
         Lcd_Cmd(_LCD_CLEAR); // Clear display
         Lcd_Cmd(_LCD_CURSOR_OFF); // Cursor off
         Lcd_Out(1,1,"BUTTON 2");//Write text'button 2 in first row
         Delay_ms(1000);
       }
    }
    }while(1);

}
[/codesyntax]
